
How to Track Campaign URLs in Adobe Analytics?
Are you struggling to measure the success of your digital marketing campaigns effectively? If so, you’re not alone—many marketers face challenges such as a lack of tracking code reports, flexibility in campaign tracking, inconsistency in data classification, and campaign tracking codes.
Utilizing Adobe Analytics is crucial for digital marketers aiming to gauge the success of their marketing initiatives. The ability to reallocate resources from underperforming campaigns to the most effective ones hinge on the implementation of an appropriate campaign tracking system within Adobe Analytics. Unlike Google Analytics, Adobe Analytics lacks default Campaign URL tracking, as UTM links are not recognized by Adobe. Consequently, without establishing a solid foundation within Adobe Analytics, understanding the effectiveness of digital marketing campaigns can prove to be an arduous task. This article provides insights into effectively tracking digital campaigns or campaign URLs in Adobe Analytics.
Understanding “Campaign URLs” in Adobe Analytics
In Adobe Analytics, a traceable campaign possesses a distinct structure compared to the familiar campaign URLs typically generated for Google Analytics, commonly referred to as UTM links. Adobe relies on a “Tracking Code” to capture data when visitors access your website through one of your campaign URLs. These codes deviate from the structure of Google’s UTM links. Unfortunately, if your marketing team, agency, or vendors create links using Google’s Link builder or a non-Adobe Analytics campaign URL builder, determining the most effective campaigns within Adobe Analytics becomes challenging. Even when constructing Campaign URLs correctly for Adobe Analytics, there are additional steps required to ensure accurate tracking of results.
So How Does “Campaign” Work in Adobe Analytics?
Understanding the mechanics of campaign in Adobe Analytics is crucial for effective tracking of digital marketing results. Adobe Analytics only requires a single query string parameter for campaign tracking. The query string parameter is typically referred to as the campaign ID (cid). The initial step involves ensuring you accurately capture “Campaign tracking codes” when visitors reach your site or landing pages. This process employs a JavaScript plugin known as the “GetQueryParam” plugin. This plugin functions by capturing a URL parameter, such as the campaign code (cid), and placing it in the designated campaign variable (s.campaigns) for recognition by Adobe Analytics. In Adobe Analytics, the campaign code is stored in a variable called “Tracking Code”.
For instance, if you were advertising on Facebook, constructing your campaign URL (or landing page) might look like this: https://example.com/abc?cid=facebook:ppc:campaignname. Here, the plugin facilitates the identification of the code “facebook:ppc:campaignname,” embedding it in the Adobe Analytics campaign variable to fulfill the campaign tracking objective.
From a technical perspective, configuring the URL with this structure prompts the JavaScript plugin to seek the “cid” parameter and populate the s.campaign variable accordingly:
s.campaign = s.getQueryParam(‘cid’);
Once your JavaScript file is appropriately configured to capture campaign tracking codes, the subsequent step involves assigning these codes to all your campaign URLs directing traffic to your site.
This is the part of the campaign process in which most digital marketers and agencies make the most mistakes.
The key to assigning tracking codes to campaign elements is that they have to be unique and maintain the s.campaign structure we mentioned. As long as the same tracking code is not associated with more than one campaign, you are in good shape.
Leveraging Classifications for Campaign Tracking Codes in Adobe Analytics
Now that your JavaScript Plugin is doing its job like a pro and snagging those tracking campaign codes, let’s dive into setting up your Campaign Tracking reporting. Skipping this part might make things tricky when you’re excitedly checking the Tracking Code report to see clicks and other wins. Without a good Campaign Tracking setup, understanding your campaign tracking codes in a straightforward way can get confusing as the traffic starts rolling in.
As you can imagine, making sense of hundreds of tracking codes will not be easy. The “tracking code” variable by itself doesn’t provide greater insights. Ideally, we would want to report at a campaign, channel, and source level. So, how do we group the data to achieve such reporting capabilities? Thus, the next step to help you set up for good campaign reporting is: setting up Classifications.
What is a Classification?
The purpose of a “Classification” in Adobe Analytics is to give the ability for the user to classify the collected data into any of your custom reports. In the case of campaigns, you want your Campaign Tracking report to follow a classification that you can digest. This means you can make the report be more user-friendly.
Setting up Adobe Analytics Classifications to Track Campaign URLs
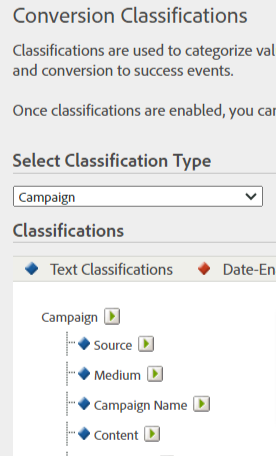
If you’re familiar with the way Google UTM link structures operate, picture the Source, Medium, Campaign Name, Term, and Content as the initial “metadata” you’d want to establish as Classifications. Unlike Google Analytics, Adobe Analytics offers the flexibility to incorporate as many of these variables as you wish. The only catch is that you need to define rules or “classifications” to guide Adobe Analytics in interpreting these variables.
Here’s a quick installation summary to add your Classifications:
Go to the Admin Console->Select the report suite->Select Conversions->Select Conversion Classification. Select your Classification Type (campaign) and then add your new classifications (Source, Medium, Campaign, Content, etc).
Next within the Admin Console->Select Classification Rule Builder and create your rule.
Once you’ve set up the Classifications and Classifications rules, you’ll be officially set up to track campaign traffic correctly inside Adobe Analytics!